well..that and some vinyl.
anyways..i thought i would start at the beginning and post all my silhouette love posts---a basic run down of all the how-tos (that i have figures out thus far!)
day 1...is basics of the basics.....

Each silhouette comes with the silhouette studio software that you upload on your computer. (the silhouette also works with other programs (i have the SCAL (sure cuts a lot) but as i go along and learn more and more..there is stuff this program does that scal can't even compare with!!!!)
once everything is all downloaded...your screen looks like this....

the first thing you are going to do is pick what size (number 1). you can do a letter...12x12 or customize to whatever size you are doing (if you are using a scrap piece of vinyl)
Number 2 is mat size. i have a 12x12 mat so i never adjust that button but if you have another size mat (do they even sale them?) then it would be handy to have...


okay. to start....the software is pretty basic...
the one you need to know is the A. (on the left hand side of your screen) it's the text button. you are going to click on that and then click on your mat

then type in what you want...

on the right hand side there is a text box that comes up....it is where you can change your font ( i have over 500..i'm a bit addicted)

pretty self explanatory...
but it does some pretty fun stuff....

push the arrow in the top left corner...and then click on your text...you can move it, make it bigger, stretch it, turn it, etc.
if you right click on the text and hit ungroup, it will disconnect each letter and you can move it how you want it..

if you want to regroup them all back together you can drag a box over all the letters (or whatever you want grouped and then right click and push group.)
another fun feature is....
see that fun gray bar after the text i just typed in?


and on the text bar on your right at the bottom...

you can adjust character spacing..

see how it spreads the circles out?
(you can make them go closer too)
and the line spacing....
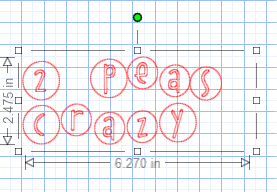
spreads out the lines of text?
are you hopelessly lost?
if you are..go back up and read it again.
back? okay. let's keep going!!!!
let's cut.

the button right up there...will send it to your silhouette..
(make sure your machine is hooked up!!!)
on the side of the screen will pop up
this...

when you click change settings you get the picture on the right...
you get to pick exactly what you are cutting with...cardstock (all thicknesses) vinyl, heat transfer....even fabric!!! it automatically will adjust the settings you need..you just have to adjust the blade to what number it says and then you can do a test cut to make sure it works!!! (it cuts a little square in the corner)
then you just click send to silhouette (after you load the paper under the rollers) and cut away!!!!
okay..another two buttons you are need to know about is...

the silhouette store first (the mouse button) : you click right on it...and it takes you to all the clipart that they have...it's pretty awesome and overwhelming and you can buy about 3000 of them *luckily they have a wishlist...to keep track of all the lovelies that you want.

this is the cute one i just downloaded!!!! happy 2012 (um....2013!) If you sign up for the silhouette blog in your reader they will do a post about the free shapes to help remind you to grab them!)

when you get them they go into your library...(the book button) this software came with 51 free ones....(the ones you see here are all free) some great basic ones that can come in handy!

my very first project was this open and closed sign i made for my sister in law salon...

i choose this frame from the free library..

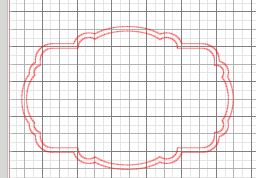
i adjusted it to fit the size of wood i had...(the same way you adjust the text..just click on that arrow button in the corner and resize it)
cut it out....
and then before i deleted it, i opened up a text box and typed open to make sure it fit inside

(if i was making them the same color i could have just printed them in one big whack..

i used the negative space of the frame to do the closed sign (cause i can't waste ANYTHING!)

i mean..there is still a lot on the left sidebar...but they are pretty basic stuff.....

cut was a little tricky at first..


but i can see how you can use it in a variety of ways...make you are doing polka dots and need some half dots for the edges...
or to rearrange the shape


it only cuts in a straight line though...so that's a little limiting.
PLEASE let me know if you have questions about anything silhouette related! i want to make sure this is as helpful as can be!!!!
You have NO idea how excited I am for these posts!!! I got a Silhouette for Christmas and I'm so overwhelmed trying to figure it all out. There is so much to know!
ReplyDeleteThanks Kimbo, this was really interesting. One thing I was wondering, where you talk about fonts up above there, I wanted to know if it uses any font you have downloaded to your computer, or only ones you have bought from the store? Thanks!
ReplyDeleteHappy 2013 :)
Thank you so much for this post! I received a Cameo for Christmas and this was just what I needed to get started. I have now gotten through the installation and registering process and am now set to go and practice. I look forward to reading your posts as they come.I have about 700 fonts to play with. :)
ReplyDeleteI think I need that open and closed sign for neighborhood friends. I really do.
ReplyDeleteThank you! Thank you! THANK YOU!!!!
ReplyDeleteYep, i just got a silhoutte and am so scared and excited!!! LOL!
all fonts you have on your computer are automatically uploaded in your studio..so the fonts you use are those! super fun and FREE!
ReplyDeleteThanks for this. I was a little worried about how complicated it would actually be but you make it sound pretty simple!
ReplyDeleteYou rock! I got a Cameo for my birthday (used your code for the Thanksgiving sale, thanks!) and I used it to make a Christmas gift for my father in law.
ReplyDeleteI painted canvas and then put a soccer ball and a cleat on it. Doing a two colored soccer ball was terrible, I couldn't keep the super skinny pieces to stay aligned properly, they kept distorting to make the soccer ball look weird. After an hour, I finally got the ball to look normal, but it was awful.
Suggestions?